WinAlldat Net
Administrator's Database Guide
Instructions for converting the database system to Microsoft SQL Server
5th revised edition 2021-05
Autors: CM, RA
0.0 Preface
The conversion to another database system should only be done in consultation with and together with an IVDK IT employee.
The abbreviation CWS = Clinical Workplace Systems is used several times
1.0 Requirements
1.1 Terminology
Schema
SQL Server uses dbo (DataBase Owner) as default schema to access the tables and other database objects. Users or groups can be assigned a schema other than dbo. Different schemas use a separate table for each table name, which is separated from the others and has the access permissions of the respective schema. For example, the schemes dbo, department1, department2 and department3 would result in the separate tables dbo.invoices, department1.invoices, department2.invoices and department3.invoices for the table invoices. In case of schema foreign access, the schema must be preceded by a . separated from the object (object = table, view, etc.) and requires the appropriate access permissions.
WinAlldatNet uses only the default schema dbo. Another schema is not provided and is not supported by the program!
Alias (Assignment via SQL Server(Configuration)Manager)
Instead of IP address of the server instance name, the access to a SQL server can be simplified by assigning an alias name e.g. winalldatnet.
If frequent restructuring of the servers takes place, it makes sense to assign an alias name, since the access name (alias) does not change when the database is moved to another server and thus does not need to be changed for the accessing KAS.
Unfortunately, every now and then the network administrators manage to block the name resolution of the alias names of the SQL Server via the network. Therefore, when using an alias name, always check the alias name resolution first in case of connection problems!
Localhost
localhost are assigned alias names for access to locally located SQL Servers. The name abbreviation applies only to the server name or IP address of the server.
Instance names must still be appended with \InstanceName.
Can only be used if the SQL Server and the WinAlldatNet program are located on the same server/PC (SQL Server Express).
1.2 Note for SQL Server installation
SQL Server uses several services that require corresponding administrative user accounts. If possible, use local accounts of the server / KAS. If a domain-only account is used, and it no longer exists, the SQL Server can no longer be administered and must be reinstalled!
2.0 Preparations
2.1 Global folder
A global folder on a network drive is required under which the WinAlldatNet program can store shared files. All WinAlldatNet users must have read and write access to this folder and must be able to create new file folders. This global folder serves among other things to contain the winalldatnetpwd.ini for the user login, the log files for program errors and the backups of the DKG updates. For simplicity, it is recommended to use the existing Access database folder for this purpose, which previously fulfilled this task.
2.2 Domain group for WinAlldatNet users (optional)
A domain group in which the WinAlldatNet 2 users are entered has proven to be useful. If a user changes, no changes have to be made to the SQL Server.
2.3. Configuration of SQL Server
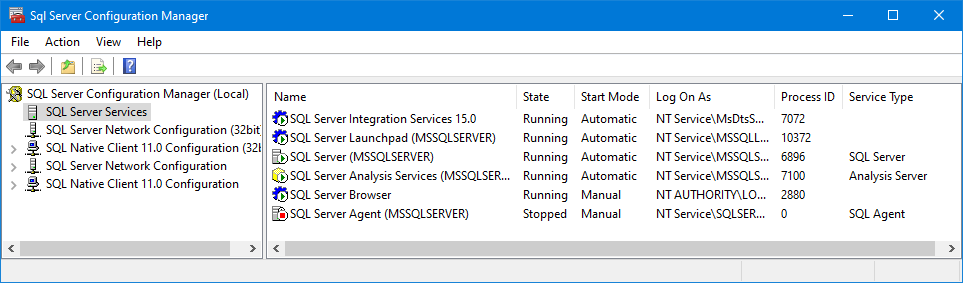
Open the SQL Server(Configuration)Manager on the server/PC with the SQL Server. This is no longer linked with some SQL Server versions, but must be called manually under C:\Windows\System32\SQLServerManagerXX.msc. The XX in the file name stands for the SQL Server version number. If more than one version is available, the newest version must be started.
Under "SQL Server Services", in addition to the actual SQL Server, the services "SQL Server Browser" and the "SQL Server Agent" associated with the SQL Server should run.
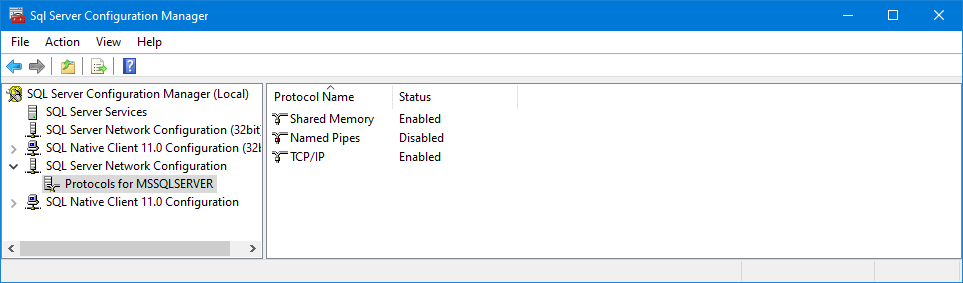
In the "SQL Server network configuration" or "SQL Server network configuration (32-bit)", check whether the TCP/IP protocol is enabled for the SQL Server in question. Alternatively, the obsolete "Named Pipes" protocol can be deactivated. A database connection via
Named Pipes is about 50% slower than via TCP/IP.
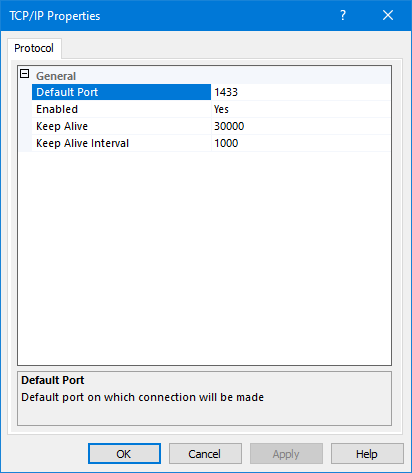
For the TCP/IP protocol, the properties must be called up (right mouse button on the entry). In the last entry (IPAll), under "Dynamic TCP ports", the entry is to be emptied and in the "TCP port" field below it, 1433 is to be entered. This procedure facilitates the setting of the firewall parameters for WinAlldatNet installations.
Proceed similarly with the "Native-Client Configuration" or "Native-Client Configuration (32 Bit)".
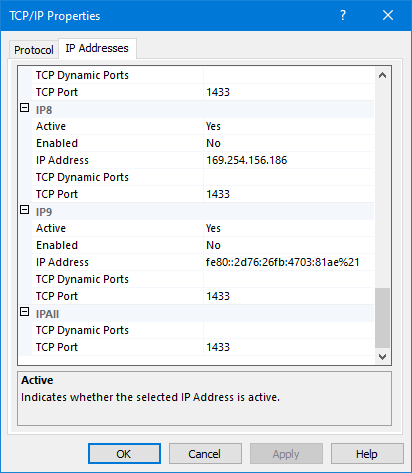
Also there you have to check under properties of the TCP/IP protocol if the SQL Server standard port 1433 is entered.
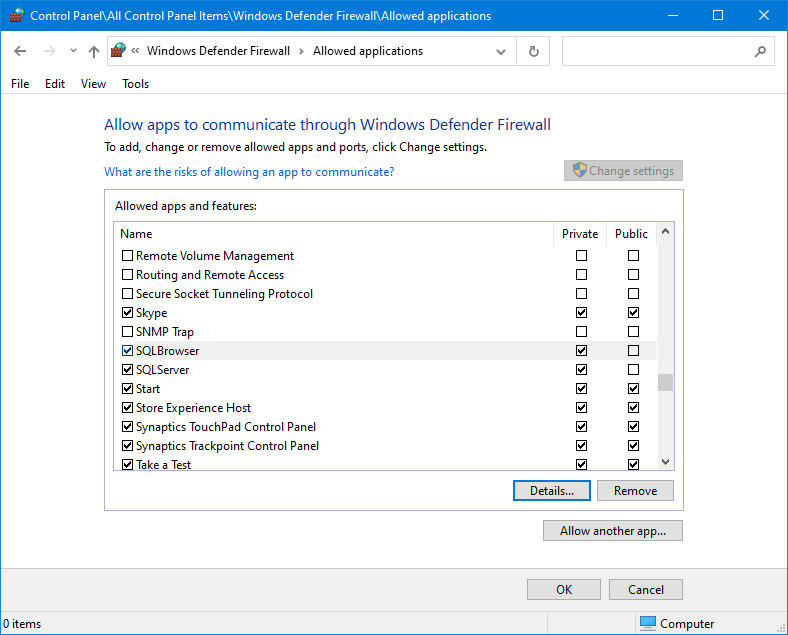
2.4 Configuration firewall for the SQL Server
On the server/PC on which the SQL Server with the WinAlldatNet databases is to run, the following ports must be released in the firewall:
TCP port 1433 (SQL Server connection)
TCP/UDP port 1434 (SQL Server browser)
2.5 Configuration firewall for SQL Server Express on normal Windows PC
As of Windows Vista, the Windows operating systems have their own operating system firewall. TCP port 1433 must be enabled there.
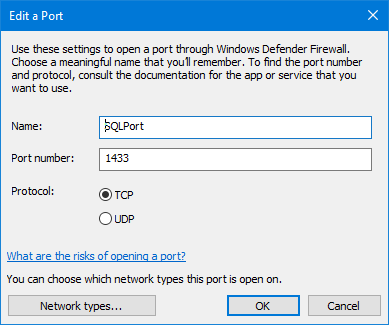
Alternatively, the following Windows shell script can be executed for the setting:
@netsh advfirewall firewall add rule name = SQLPort dir = in protocol = tcp \action = allow localport = 1433 remoteip = localsubnet profile = DOMAIN
2.6. Configuration Firewall for the WinAlldatNet Clients
The CWS with WinAlldatNet require an unlocked TCP port 1433.
3.0 Immediate preparations before the changeover
On the PC with the WinAlldatNet installation from which the conversion takes place, the following line must be added to the winalldatnet.ini configuration file: -localimportexportadmin
Note: The entry must be in a separate line!
4.0 Performing the database conversion
Log on to the PC with WinAlldatNet installation with the Windows user profile, which has sufficient permissions to create a database on the SQL server intended for WinAlldatNet.
Now start WinAlldatNet with the user Chef (password IVDK if it has not been changed).
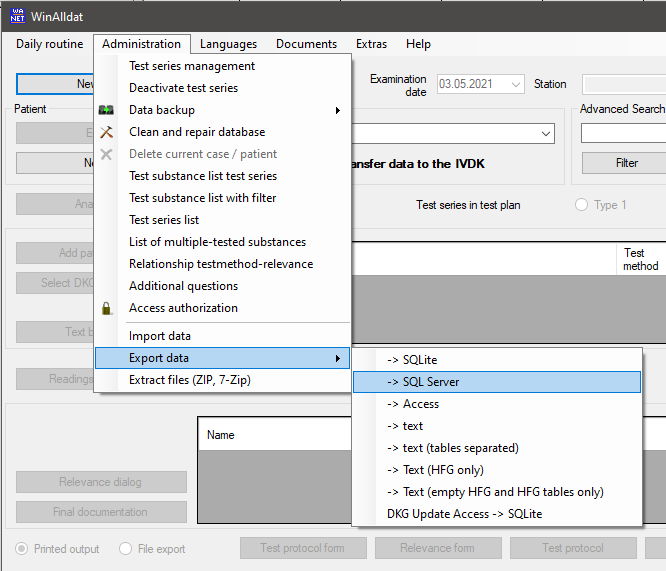
Now open the submenu "Export data" in the menu "Utilities" and select the database system into which the currently used database should be converted.
Now enter the IP address or the server name of the SQL server. If additional instance names were assigned to the SQL server, the instance name must be appended to the IP address or the server name as \instance name.
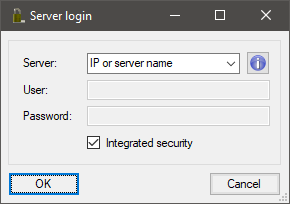
Alternatively, you can use the information icon to search for the server in the network. This search may take some time. The search process is finished as soon as the combo box can be opened or opens automatically with newer WinAlldatNet versions.
The checkbox Integrated Security uses the current Windows user login as login to the SQL Server database. The specification of a user name and the corresponding password is not necessary.
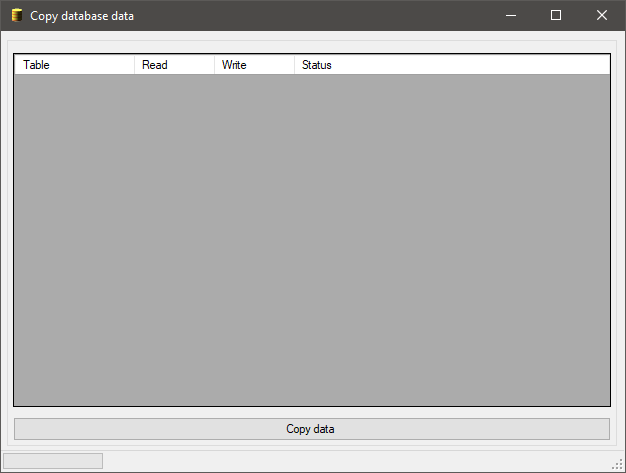
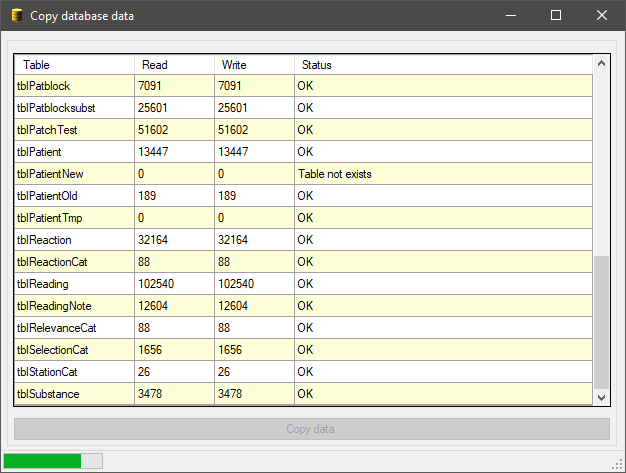
To start the conversion process press the "Copy data" button. Non-existing databases will be created, if they do not exist. Before the data transfer, the database update is performed, thus bringing the target database up to date.
During the run, the conversion status is displayed for each table. Successfully converted tables get the status "Ok". Tables that do not exist in the target database get the status "Table not exists". These tables are not used by WinAlldatNet 2 or are located in an external database. In case of a faulty conversion, the faulty SQL statements are displayed as status text. A double click with the left mouse button shows the error text in a separate text display.
In the case of the TRANSACTION_LOG table, error messages may be generated by SQL Script in the SQL. This is only the case if logging according to the Swiss Human Research Act (HRA) is switched on in the options.
5.0 Final work
The former Access database should now be archived and removed or renamed so that no WinAlldatNet installation can enter new data there.
5.1 Setting the database authorizations in SQL server
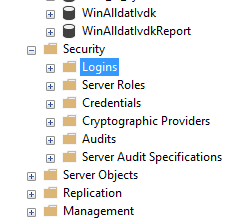
Now start the SQL Server Management Studio. This can be located on the server/PC with the SQL Server or as a separate installation on another PC. Connect to the SQL Server that contains the WinAlldatNet databases and select the Logins section under Security in the Object Explorer. Note that this is the security of the server and not the security area of the respective databases!
5.1.1 Adding a new user / group
If the users or the user group for WinAlldatNet are not yet entered under SQL Server logins, open the selection menu with the right mouse button of the logins and select "New Login...".
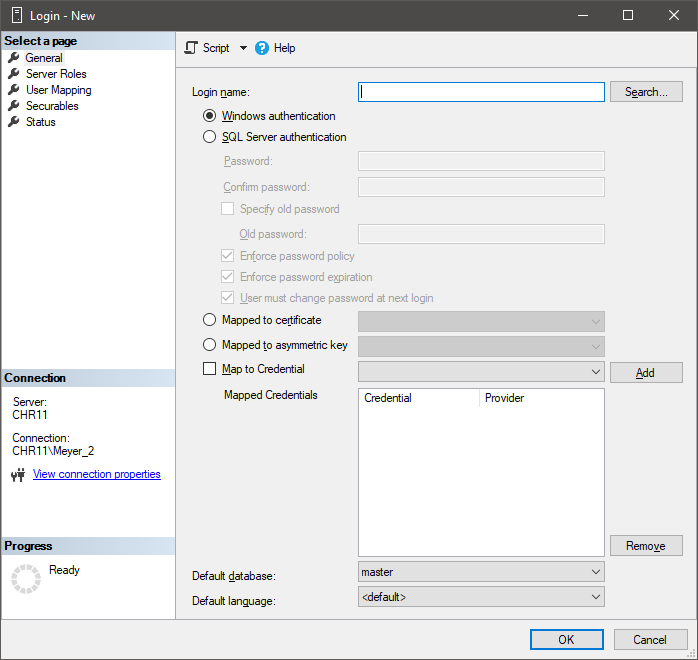
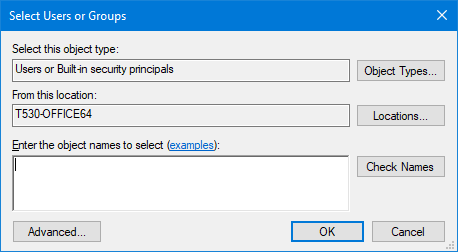
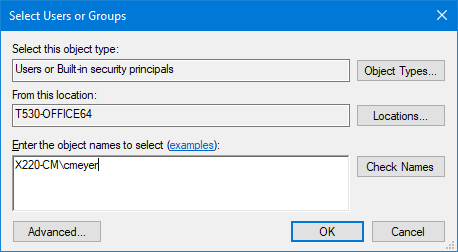
In the newly opened "Login - New" window, click the "Search ..." button to search for the user / user group in the domain path.
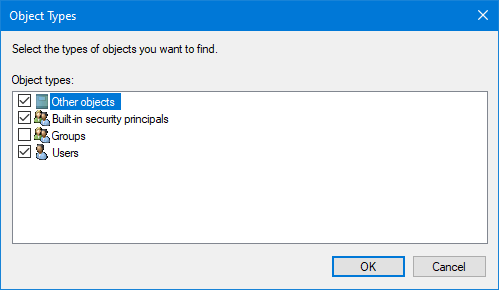
If you want to add a user group, click the "Object types ..." button. Select "Groups" as the object type. This is usually not selected!
Back in the "Select user or group" window, you also have the option under "Paths..." to set the starting point of the search in the domain structure. You can now enter the user name or the name of the user group under "Enter the object names to be used" and click on the "Check names" button. Alternatively, you can open the advanced search ("Advanced..." button).
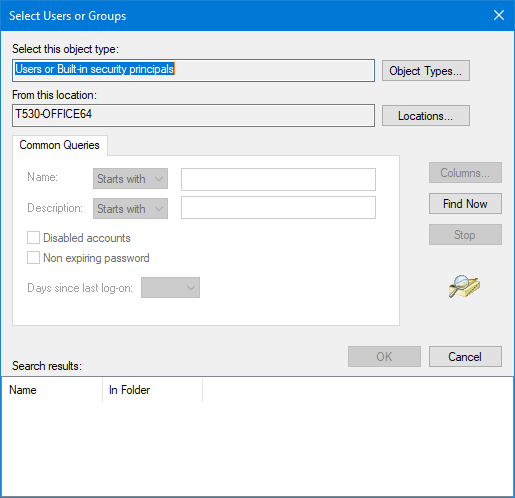
The "Search now..." button displays the available users and groups, depending on the selected object types.
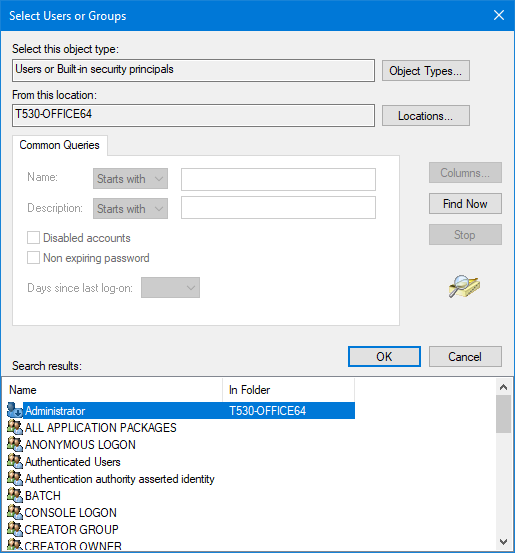
If you have one or more domains, you must open the corresponding branches to get to the desired user or group. Depending on the permissions, a user query may appear to open such a branch.
When you have selected the appropriate user or group, click "Ok".
The selected user or user group is now entered and the creation can be completed with "OK" and you are back in the "Login - New" window to set the permissions.
5.1.2 Set the user permissions
If you have skipped 5.1.1 because the user or user group is already entered under SQL Server Logins, open the "Logins" branch selected under 5.1 in the Object Explorer and select the desired user or group by double-clicking on it.
Now switch from to the "User assignment".
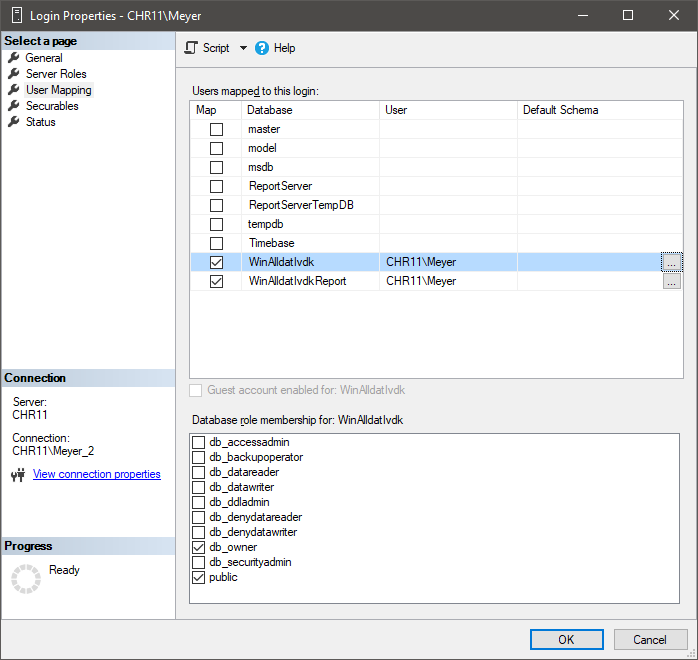
There the databases "WinAlldatIvdk" and "WinAlldatIvdkReport" are to be assigned. The WinAlldatNet program needs the dbo schema as default schema, because database updates are imported via the WinAlldatNet program.
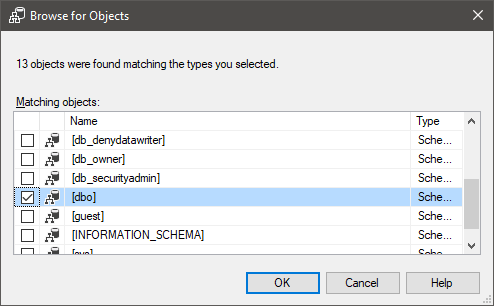
In order to add the default schema, press the respective button "..." belonging to the database.

"Schemas" is already selected as the object type, so you can enter the schema dbo under "Enter the object names to be used". You must then verify the name with "Verify name". Alternatively, you can select the schema via "Browse...".
Finally, for both databases, under "Membership in database role for: Database name", select "db_owner".

All other required settings correspond to the default settings and do not need to be changed. With "OK" the changes are completed.
Note: It is possible to use the local SQLite database winalldatnetrep.db3 instead of the WinAlldatIvdkReport database for "Reports and Lists". The settings for the WinAlldatIvdkReport database would be omitted in this case!
5.1.3 Alternative settings of user permissions
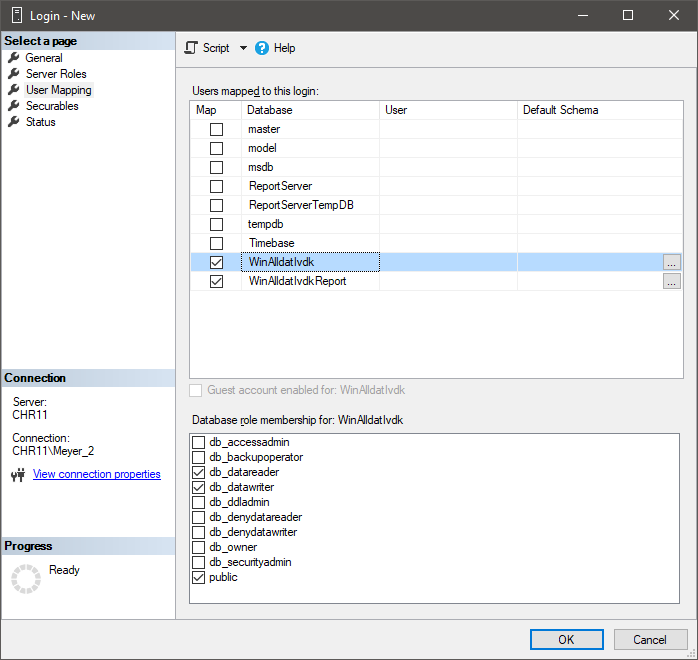
Due to regulations of individual data protection officers, it may not be possible to set the schema "dbo" and the database role "db_owner". In this case the schema remains empty. Two variants are possible as database role entries:
Variant 1: Read/write authorization and authorization to change tables
For this, instead of the database role "db_owner", the database roles "db_Datareader", "db_Datawriter" and "db_dlladmin" must be selected.

In this variant there are hardly any restrictions for the operation of the program. Only database backups cannot be created from within the program.
Variant 2: Only read/write authorization without authorization to change tables.
For this, instead of the database role "db_owner", the database roles "db_datareader", and "db_datawriter" must be selected.
For this variant the WinAlldatNet program must be additionally called with the parameter -paranoia. This parameter locks program areas which require authorizations to change database tables and issues a corresponding message. These program areas must then be executed by a user with appropriate administrative database authorizations. Affected program functions are the DKG test series update, the database update after importing a new program version and the creation of database backups from within the program.
This parameter prevents users from executing program functions that make changes to database tables. In this case, a corresponding message is issued. The DKG test series update, database update after program update and database backup cannot be executed by the normal users from the program. For this purpose, an administrative user with corresponding authorizations on the database is absolutely necessary!
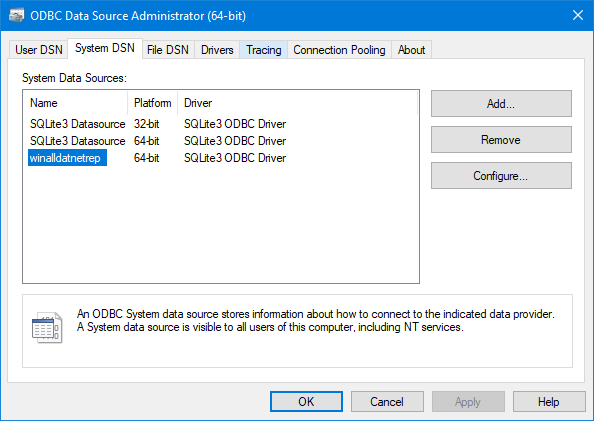
5.2 Modification of the ODBC DSN entry winalldatnetrep on SQL Server
After the migration to the SQL Server the existing connection of the WinAlldat Net View Basic module has to be changed or adapted.
The SQLite ODBC entry needed to access the winalldatnetrep.db3 database has to be changed on the existing WinAlldatNet client installations as follows:
To do this, open the ODBC Data Source Administrator (32-bit) or if you are using the 64-bit version of WinAlldatNet, open the corresponding ODBC Data Source Administrator (64-bit).
Now remove the old ODBC DSN entry "winalldatnetrep" under User DSN or under System DSN. If this entry does not exist, the ODBC driver setup for the SQLite ODBC driver was not performed during the WinAlldatNet installation.
Now create a new data source with "Add..." and select one of the SQL Server drivers (usually the newest one).
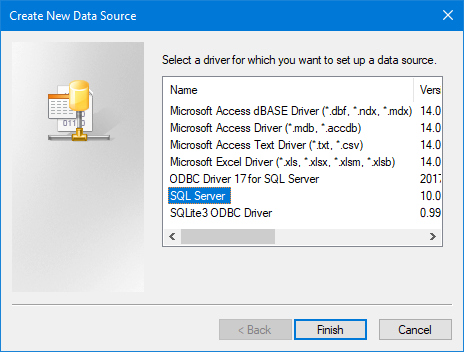
Now set the data source name to "winalldatnetrep" (without the ").
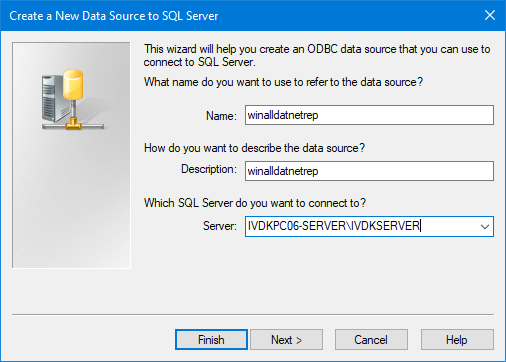
Then enter the SQL Server on which the reporting database WinAlldatIvdkReport is located under Server. Alternatively you can expand the empty selection box. The SQL servers available in the network are then displayed for selection. This process may take some time depending on the network size!
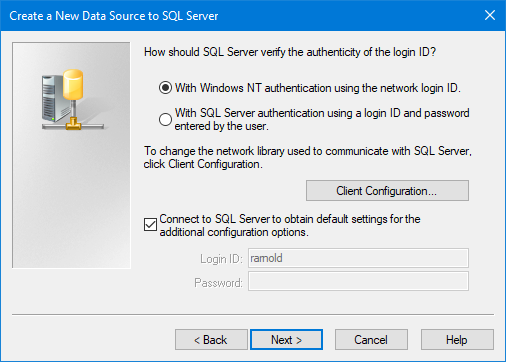
The default settings are used, so you can continue by pressing the "Next >" button.
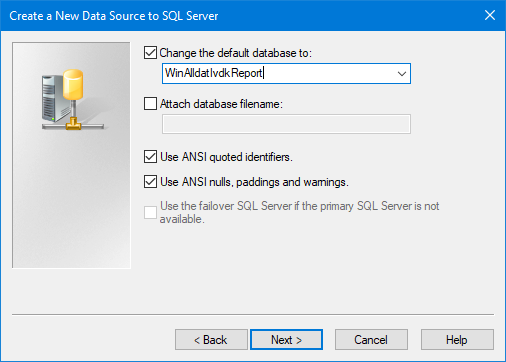 Change the default database to “WinAlldatIvdkReport” and press the "Next >" button.
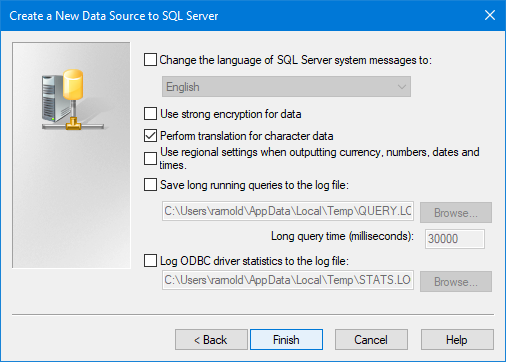
Here also only the default settings are used, so that the settings can be finished with "Finish".
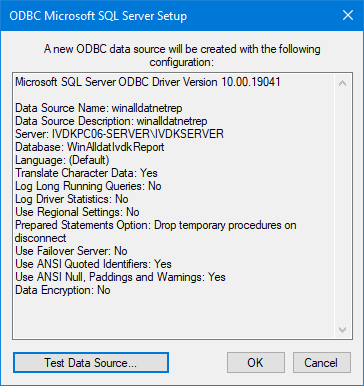
Summary dialogue of the ODBC SQL Server Setup configuration. Finally the button “Test data source” can be applied to validate the ODBC settings.
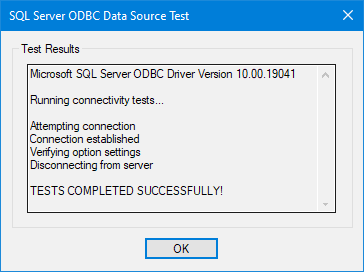
After the successful ODBC Data Source validation, the dialogue can be closed.
5.3 Setting up the clients Accessing the databases via winalldatnet.ini
5.3.1 Introduction to the structure of the winalldatnet.ini configuration file
WinAlldatNet no longer uses the ODBC interface of its predecessors WinAlldat and WinAlldat ESSCA for the database connection. For compatibility reasons, however, the file path to the database is still read from the ODBC interface first and used as connection to the Access database. Under WinAlldatNet 2 the database parameters of WinAlldatNet.exe are passed as command line parameters. The available parameters are displayed with WinAlldatNet.exe -? To simplify maintenance for multi-user installations, command line parameters can also be passed using the winalldatnet.ini text file. It should be noted that all parameters used and their possible sub-parameters must be in separate lines.
Example:
winAlldatNet.exe -log -dbpath d: \ winalldat \ winalldativdk.mdb -jet is entered in winalldatnet.ini as follows:
-log
-dbpath
d:\winalldat\winalldativdk.mdb
-jet
If the same parameter occurs both as a command line parameter and in winalldatnet.ini, the command line parameter is overwritten by the winalldatnet.ini entry. The winalldatnet.ini is not case sensitive. All - parameter beginnings can also be replaced by / (Ex: -log can also be written as /log).
5.3.2 Client access via Integrated Security (SQL server)
The user/domain user logged on under Windows is used here to log on to the SQL Server.
Content of winalldatnet.ini:
-sqlserver
-server
IP of the server or server name\instance name (\instance name is omitted if not available)
-globalpath
Drive letter:\file path global folder\
Alternatively for drive letter: \file path global folder\ you can also use
\\servername\file path global folder\
The global folder on a network drive is needed so that the WinAlldatNet program can store shared files. All WinAlldatNet users must have read and write permissions there and must be able to create new file folders. This global folder is used among other things to hold the winalldatnetpwd.ini which contains the hash values for the WinAlldatNet user logins. For simplification the already existing network folder on which the Access database was located can be used.
5.3.3 Client access with restricted user permissions
5.3.3.1 Operating system
Client access for installation environments without write file permissions to the WinAlldatNet program folder (also applies to installations under c:\Programs!)
-readonlyinstall
This parameter causes all files that are changed by the program during operation to be swapped out to the global folder. The parameter
-globalpath with drive path as sub-parameter is mandatory additionally!
5.3.3.2 Database
-paranoia
If users have only read/write access to the database tables, no program functions can be executed from the program which require authorizations to change database tables. The -paranoia parameter locks these program areas and displays a corresponding message. These functions must be executed by a user with administrative database authorizations. Affected program functions are the DKG test series update, the database update after importing a new program version and the creation of database backups from within the program.
5.3.4 Other useful winalldatnet.ini parameters
-log
WinAlldatNet logs all exception errors. With the parameter -log additionally all
database accesses with errors (read and write) are also logged.
-update
WinAlldatNet checks after the program call whether a new version is available. If a new maintenance update is available, it will be downloaded via HTTP protocol from the IVDK server and installed.
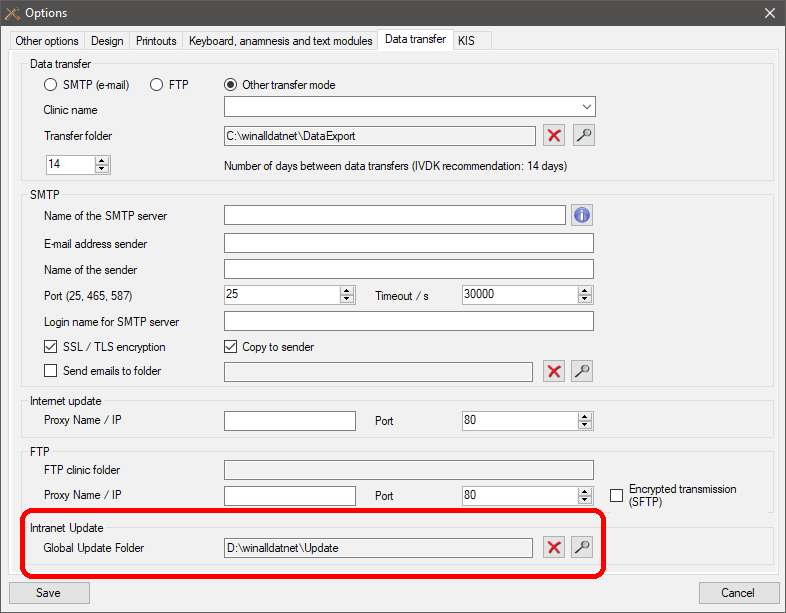
If the HTTP protocol on the clinical workstation systems (CWS) is blocked by a firewall, the intranet update can optionally be activated by specifying the path (windowshare) of an intranet server.
-update
Variant 1 (classic): Drive letter:\file path intranet folder
Variant 2 (UNC): \\ servername\file path intranet folder
The following screenshot shows the classic setting (variant 1) as an example:
The current WinalldatNet maintenance update must be copied manually into the intranet folder. The WinAlldatNet update consists of the 2 files version.txt and winalldatnet.zip and can be downloaded from the IVDK server at https://winalldatnet.ivdk.org/update/.
-x64
This parameter is mandatory if a 64-bit Microsoft Office is installed!
-localreport
When using SQL Server as database, a separate SQL Server database "WinAlldatIvdkReport" is used for reports and lists. With this parameter the local winalldatnetrep.db3 is still used for reports and lists.
5.3.5 winalldatnet.ini Parameters for Administrators
-dbtest
This parameter starts a test window with checking of possible database connections. Use this parameter on CWS where WinAlldatNet cannot be started because of not found or faulty database. Access errors can be limited in this way. From the test window you can also call the system information built into WinAlldatNet.
-localimportexportadmin
This parameter requires the login with the user "Chef"!
Unlocks the submenus "Import data" and "Export data" in the "Utilities" menu.
-localdbadmin
This parameter requires the login with the user "Chef"!
Unlocks the submenus "DB Editor" and "DB Test" in the "Utilities" menu. Under "DB Test" is the same test window for checking the database connections as when the program is called with the -dbtest parameter. The "DB Editor" is an integrated SQL editor for editing the databases used by WinAlldatNet via SQL commands.
6.0 Appendix
6.1 Differences in the database structure Access to SQL Server
When using SQLite as database, the Access file Winalldativdk.mdb, or for ESSCA version Winalldatessca.mdb are replaced by the SQL Server database WinAlldatIvdk. In this case, the tblCaseEssca table included in the IVDK version was replaced by the extended tblCaseEssca table from the ESSCA version.
The SQLite database winalldatnetrep.db3 used for reports and lists has been dropped *). The tables contained there are located in the SQL Server database WinAlldatIvdkReport. The SQLite ODBC entry needed to access the winalldativdk.db3 database is replaced by a corresponding ODBC entry to the WinAlldatIvdkReport SQL Server database.
*) Using the -localreport parameter, the locally located winalldatnetrep.db3 can still be used.